


Editing Nigel Danson’s Images
I was browsing around YouTube and in particular Nigel Danson’s channel, I picked one of them and went to his website to have a browse around. While on his website, I saw a challenge he ran against the public to edit 3 of his RAW files and over 1000 people responded. Now, I was a bit late to this, so I downloaded the files as they are still available, and sent a quick e-mail to Nigel asking if he would allow me to write a blog post about my approach with his files. Luckily, he responded promptly with a ‘go for it’.
I decided not to watch the video he made about the results or to examine the blog post on his website because I wanted to approach it my own way, and instead I watched the video after my edits to compare the results (I’ve embedded the video down at the bottom of this post if you would like to watch it too). My edits were quite different to the ones he included in the video but that’s what makes this experiment interesting.
I was drawn to this idea because it really demonstrates how the artistic process of photography is connected to the editing of the RAW files. Through editing we are giving the crude data of an image life and bringing out what we want from a scene. It was fascinating to see the various ways people approached the editing process and it’s certainly an idea that I will look into doing in the future. I think it’s a great way for people to practice and learn editing by learning from their peers using the same base file.
However, I do think that a connection to the image, being the person taking the image in the moment, is very important because I developed these images in a way that I think the scene looked but I might have developed them in a way that is completely different, if I had been on location at the time.
All in all, a fascinating experiment and it certainly made me look at my editing process and the way that I see images. Let’s begin with image 1…

The Original RAW File
The Faroe Islands Image
The above image is a low resolution copy of the RAW file. A beautiful scene, a lot of dynamic range with the clouds and sky quite bright and casting the landscape into shadow. Nigel being a magnificent photographer conserved the majority of the highlights with only the sun itself being a burnt spot and I wouldn’t expect anything less. Let’s have a look at my final version and I talk about my approach with this file…

My Edit
Quite the difference and from the images Nigel shared on his blog and video, everyone created something a little different which I think is a great example of people’s editing styles.
I’ll walk you through my approach…

Framing
My first step when editing images is to focus on the framing of the image, so I began by trying to remove the vignette and correcting the camera’s distortion. I did this manually as I wasn’t sure of the camera and lens that Nigel had used at the time.
Next step was to level the horizon and give a small crop to remove the remaining vignette, and to remove the rock on the left hand side because I felt it was just pulling the composition off balance.
And I preferred the way it looked with the rock and person jutting into the frame.

Global Adjustments
I then moved onto the global adjustments in exposure. I try not to over edit when adjusting the exposure but with such a high contrast situation, it took quite a bit to get more some definition back. I increased the exposure by a quarter stop and then adjusted highlights, shadows, whites and dehaze. I decided to increase the whites to bring out the whites in the waves as reducing the whites it looked very dull.
To create a bit of balance I knew that this images required local adjustments more than global ones, but before I moved onto that, I adjusted the contrast and colours. I wanted to really show off the colours that were here, but I would refine them with local colour adjustments later.

Sky Adjustment Layer
Next step was to begin local adjustments with a graduated filter targeting the sky. The sky definitely needed to be darker. I started with the basic darken and dehaze filter, I didn’t want the sea stacks to be darkened though and I used the luminance range masking on the filter to apply it only to the brightest parts of the sky. Once it was masked to the sky alone, I adjusted the settings until the sky had the balance that I wanted it to, bringing out some of the details in the sky yet keeping the soft look by decreasing the clarity.

Land Adjustment Layer
The sky was looking good but the foreground and sea stacks were still a bit dark. Instead of using a brush or globally adjusting for the darker areas, I used another graduated filter coming from the bottom of the image and I used the luminance range masking to limit it to the darker areas of the image because the sea stacks protruded into the sky and the new adjustment would have affected the sky as well. The purpose of this layer was to brighten the foreground but I increased the highlights to make the white water pop a little more and counteract the global highlights change, which had been focused more on the sky, and thanks to the range mask it only affected the whites in the immediate foreground.

Adjusting Colours
The exposure was looking a lot better but I wanted to work on the colours a bit more. I wanted to emphasise the contrasting colours of blue, orange and the green because, for me at least, the Faroe Islands always look very green and vibrant. I always focus on the colours by colour rather than by HSL (hue, saturation, luminance) and I always play with them a bit until it looks the way that I want it.
I started in the oranges and yellows, I increased the saturation but reduced the luminance. In the foreground there is some orange/yellow lichen or seaweed growing on the rocks and I wanted them to pop, but reducing the luminance helped the bright spots some more.
Greens were the next stop, increasing the saturation again for the foreground seaweed but also for the green tops of the islands, again because that’s the way I think of the Faroes.
Aqua and Blue were the last colours adjustments because I wanted to brighten and saturate them to contrast with the bright oranges, there was also a nice aqua colour in the waves that I was hoping to bring out.
I was more or less finished with this image. Just checking at 100% for dust spots, I found a couple, and I also noticed the chromatic aberration hadn’t been dealt with completely so required some manual adjusting until it was completely removed. Image complete.

Finished Image

Original RAW File
Birch Forest Image
To be honest, this image was the least interesting for me out of the 3. Now, don’t get me wrong, I love forest photography but I wouldn’t/couldn’t see the composition that Nigel was going for here. It wasn’t until I finished editing the picture that I liked the composition and I understood the image better.
Out of the 3, this image exemplified the notion that the creation of an image connects you to that image. Nigel stood there in the forest, he decided to stand in a particular spot and take this image because he had an idea for the final image. He could see an image in that landscape and what would really make this image is how he processed it, simply because he had that in mind when taking it.
My edit of this image was again a case of how do I think the scene should look, rather than the way the scene actually was, let’s have a look…

My Edit
As I mentioned with the Faroe Islands picture, my first step with any image is to decide the framing. I of course, removed the vignette and the distortion from the image to get the trees a bit straighter. The sky in this image had to go, it was completely distracting from the subjects of the trees. The trees looked good and I liked their uniform pattern. This, I thought, might have been Nigel’s intention with the image. The subject was an individual tree but instead was the pattern and spacing of the trees. I decided that a panorama crop would be best to keep as much of that pattern as possible. Cropping to 16:9 wasn’t enough, so I unlocked the dimensions and brought it lower until the sky was completely removed and the trees had a beautiful pattern.
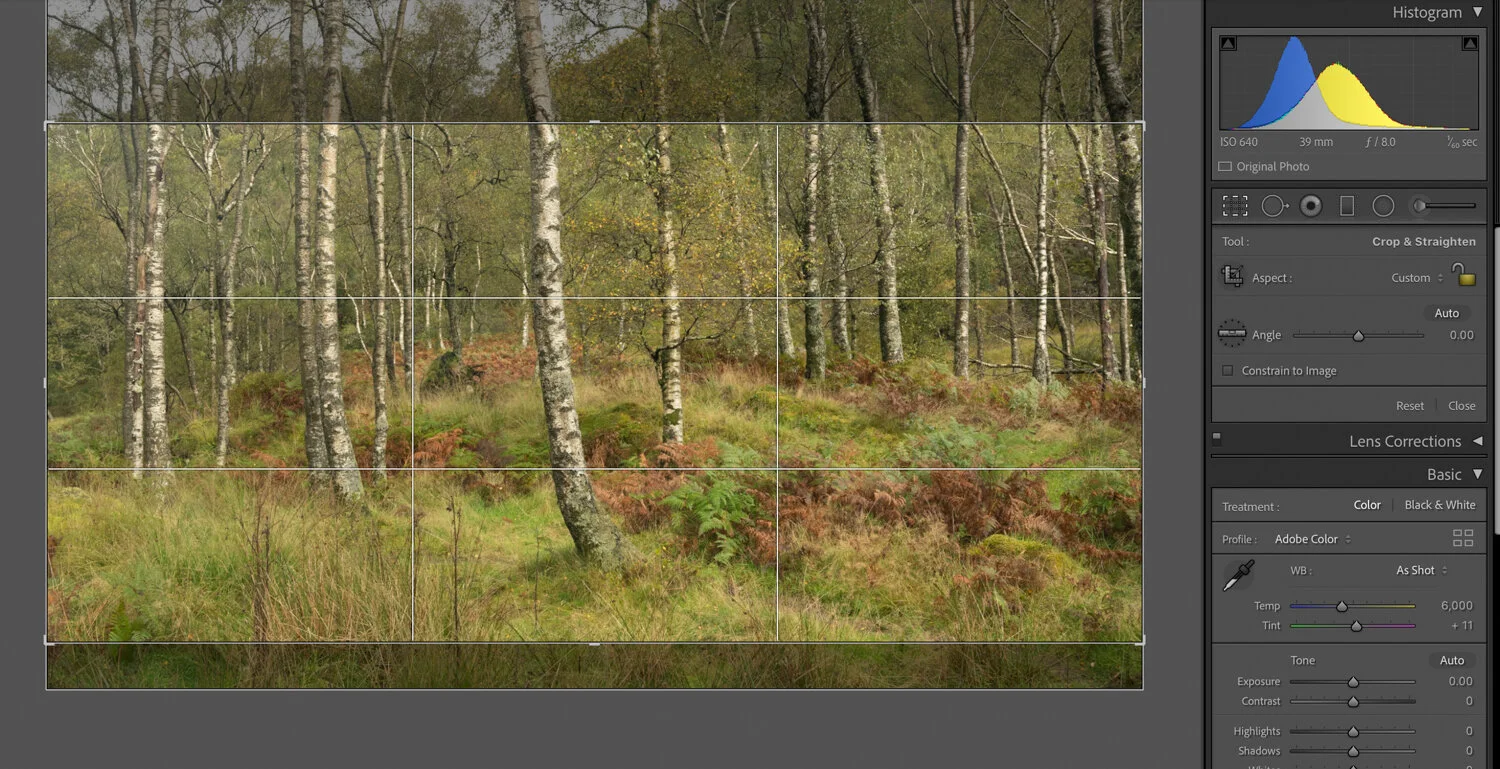
Framing
Global adjustments this time and to get the contrast I was after required several fiddling adjustments. I felt the image was a little too dark, so increased the exposure a fraction of a stop. And then set to work on the contrast. I wanted the whites to be a little brighter, bringing out the bark on the silver birches and the softness in the background, and I wanted the blacks to be darker because the increase in whites made the image a little dull/flat and by darkening the blacks I introduced more contrast. I also reduced the clarity, again to emphasise the softness of the image.

Exposure Adjustments
The exposure was looking good but I wanted to affect the global colour adjustments. I felt like it had a very yellow tinge to the image, and I wanted to reduce that affect. I know you’re asking, ‘why reduce the yellow in an autumn image?’ For me, it was just too yellow. It seemed the white balance was a little off, so I reduced the yellow. By increasing the blues as well, I increased the shadows of the background, making the forest more mysterious, and the silver of the bark became more prominent, before it had a golden hue to it. The problem with reducing the temperature of the image was that it became very green, so I adjusted the tint by 13 to get a better balance to the colours. Small adjustments to the vibrance and saturation, and I was ready to move onto local colour adjustments.

Global Colour Adjusments
The two colours I needed to focus on for the local adjustments were orange and yellow because I had reduced their presence by adjusting the white balance. The greens were also a little annoying.
For orange, I increased saturation but decreased luminance. By decreasing the luminance, the dead bracken throughout the background and foreground darkened and became a strong contrast to the greens.
For yellow, I increased both saturation and luminance, in an attempt to bring out the little leaves of the central birch tree, which I think worked well.
For green, I reduced the hue so it was a less blue-green and more yellow-green. I also reduced the saturation and luminance to make the green’s presence a little less in your face. The contrast between the greens and oranges were quite nice but the greens were a bit strong, in my opinion, hence reducing their presence.

Local Colour Adjustments
Last step was a simple burn brush to darken the background and the immediate foreground. Exposure was set to -0.30 and I reduced the flow rate to 70% and that looked good. There were no clear brush marks and it blended with the whole landscape well. The benefit was a darkening of the background shadows that made the central tree stand out just a little more. All finished now. Checking the image over I couldn’t see any spots, nor would I expect to in such a varied landscape, and I couldn’t see any chromatic aberration because there wasn’t any high contrast areas.

Brush Layer
I do think this image, in particular, had a connection with the creator. The Faroe Islands Image above and the Lofoten image below both could have been taking by almost anyone. They have a clear subject, the sea stacks of the Faroe’s and the red huts/mountain of Lofoten. Both are quite classic images, but this image was a lot softer and felt like most photographer’s would have just walked passed the trees without seeing an image there. Whereas Nigel saw something and wanted to create an image to tell a story of that time and place. I could be wrong, but that was my feeling when editing them.

Finished Image

Original RAW File
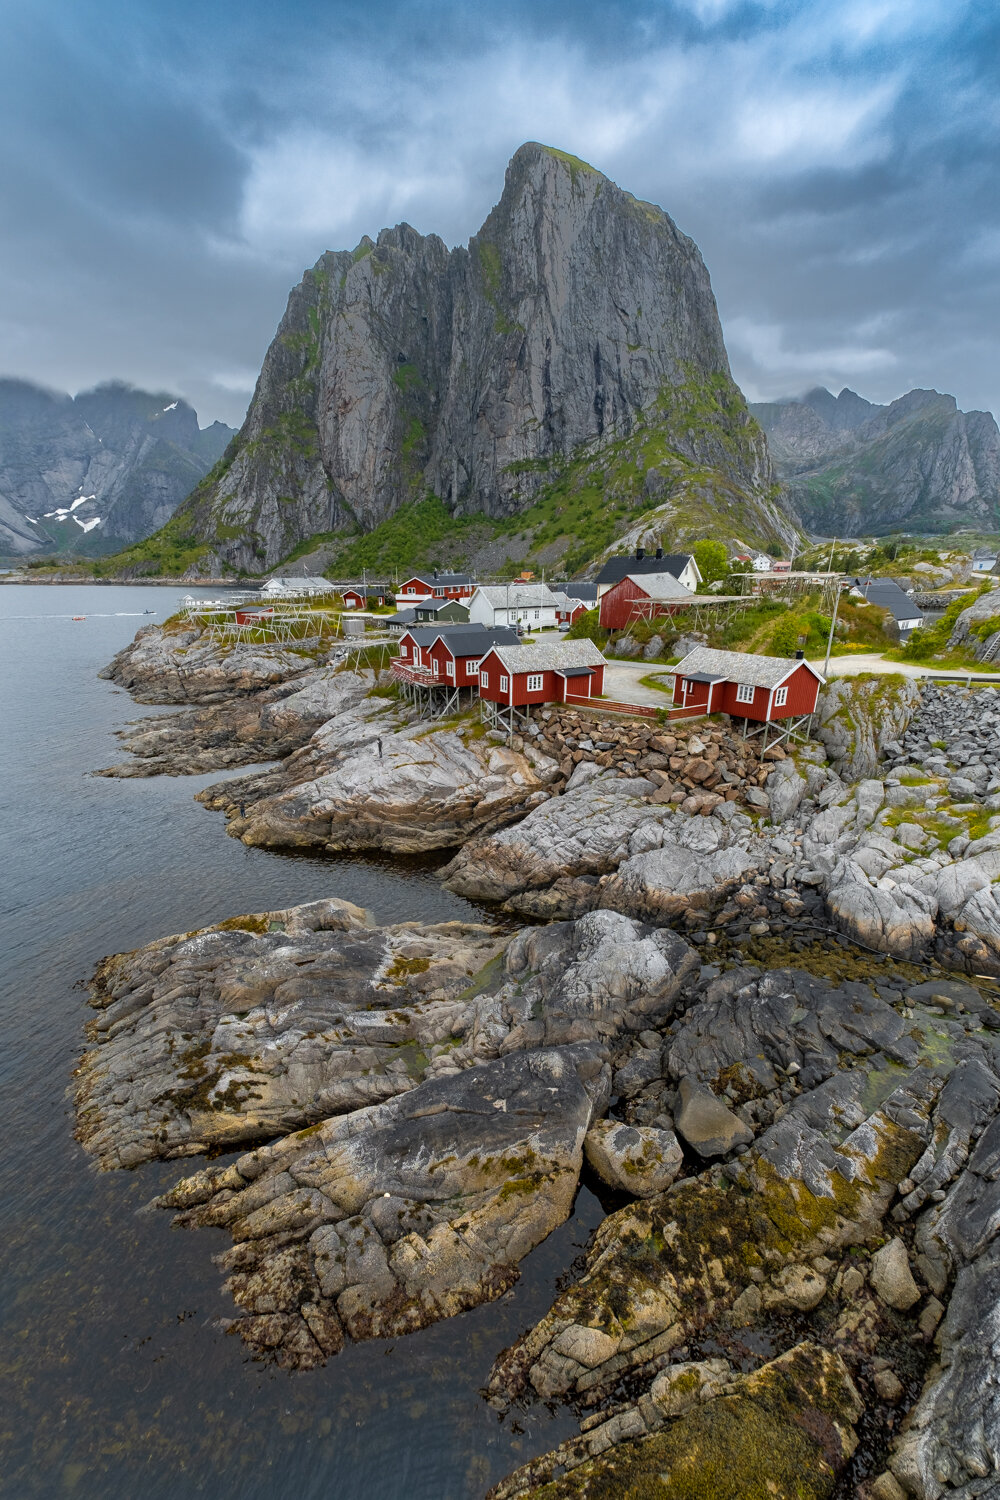
Lofoten Image
This is quite the classic view of Lofoten, when I’ve seen images from this location, this view is always one of them. It’s a great composition, the rocks in the foreground, the huts in the middle and the mountain in the background. The biggest issue with this image is the fairly bland sky. Now, I have no idea what the clouds actually looked like as I wasn’t there, but I imagine they had a bit more drama than what the camera captured. That was my aim when editing this image, bring back the drama. Let’s see how well I did…

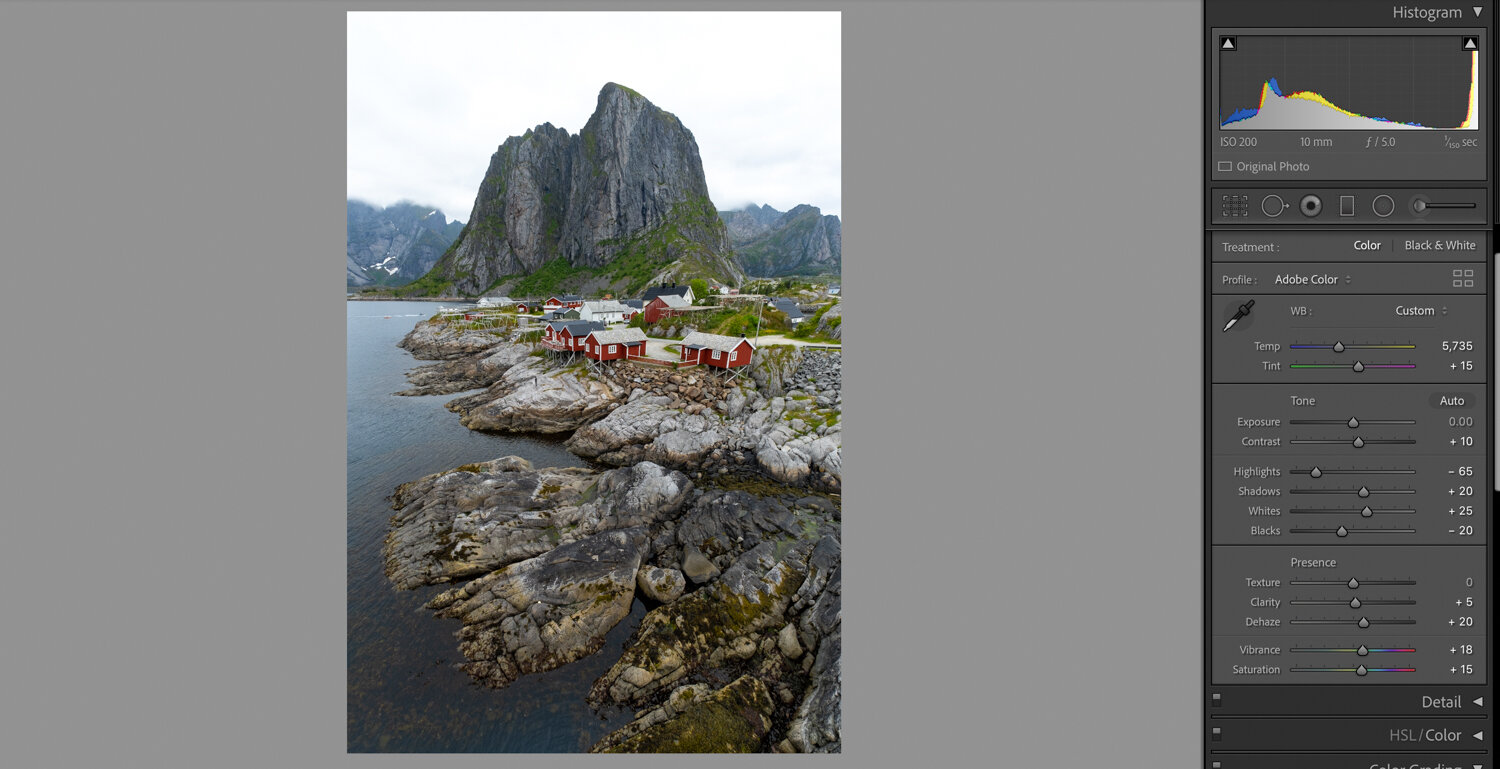
My Edit
You will have noticed I changed the crop. I’ll explain why in just a second, but other aspects you may have noticed are the sky and the overall colour saturation increase. Again, I have no idea what the image should look like, I just was giving it my own style. As you might have guessed, time to walk through my adjustments.

Framing
That’s the crop that I ended up with but I actually didn’t get that crop until much later in my editing process. I really liked the foreground elements, so for the majority of my editing I kept the original aspect. However, later on when I was checking the image at 100% for any dust spots and chromatic aberration that might have been missed, I noticed a car on the edge of the frame.

Car on the edge
This annoyed the hell out of me! Once I saw it, that was all I could see, my eye would just be drawn over to that intrusion in the frame. I could’ve done a content aware fill but there was also a gap in the background where the plane of the primary mountain was interrupted by the sea entering a channel, so I decided a crop would remove that little distraction as well. Thus creating 3 planes, foreground (rocks), middle ground (village), and background (large mountain). You know my process now, so the next step is global adjustments.
Global Adjustments
Just like the Faroe Islands image above, I knew the majority of the editing would be handled by local adjustments rather than global ones. Still I adjusted the exposure until I felt it looked better, mainly concentrating on the mountain in the background and the foreground rocks for guidance.
Like the Faroe Islands image I wanted that contrast between green, blue and red. I felt like this was a Norwegian summer so it should be quite vibrant and green, if it was an autumn I would have toned the greens down. To be fair, I wasn’t sure of when Nigel took the picture, I guessed it was the summer.
I decreased the blacks and highlights and increased the whites and shadows, by pairing two opposites, it created a nice contrast but the local adjustments would go further. As with Faroe Islands, I began with the sky…

Sky Grad Filter
Quite the drastic graduated filter! I wanted to bring out the definition in the clouds, the complete white was really distracting from the whole image. I fiddled with the settings of the grad filter until it was creating enough drama in the sky for my liking. I decided that the clouds would have a presence, like a summer storm.
If I had been there, I think I would have approached the clouds differently because I would know what they looked like. Instead I was flying blind, and I wanted to bring out as much detail as possible. The luminosity mask really saved the day! Without the luminosity mask, the mountain has a black splodge drooping over half of it, but by limiting the grad filter to only the brightest parts of the sky, the mountain retained all of the detail and none of the mask.
I also decided to give the clouds I bit of a blue tint, when you see summer storm clouds they are a little blue and I felt when the clouds were a bland grey they competed with the mountain’s presence. As I said above, the contrasting colour of the blue, greens and red were a part of my editing decision making process. The blue-ish clouds created a better contrast to the huts, in my opinion.

Land Grad Filter
Another graduated filter but focusing on brightening the foreground. Starting with the basic dodge filter, I then adjusted the luminance mask to limit it to the darkest 45% and increased the smoothing as well. I then increased the exposure from the generic 0.25 to 0.35 and increased the shadows by 12. That really made the foreground pop a little more. However, I found the huts were now a little bright and if I adjusted the luminance mask it messed with the foreground too much, hence…

Burn Brush
I just used a burn brush with a flow rate of 70% and applied a little to the hut area just to dampen the highlights of the bright whites in that area of the image. Local Colour adjustments up next…

Local Colour Adjustments
As with the Faroe Islands Image, I adjusted the oranges, yellows, greens, aquas and blues to create the right balance to the image.
For the oranges a simple increase in luminance and saturation to bring out some of the seaweed on the immediate foreground.
For the Yellows, a decrease in hue to bring them closer to the orange scale, and then an increase in saturation and luminance as well for the same reasons.
Greens had a decrease in hue as well, I felt they were too dark in 0 and benefitted from a little more yellow in their tint. A slight increase in saturation and luminance made the green areas of the background more prominent and contrasting the reds of the huts.
Aquas had an increase in all 3 areas, hue was the primary concern because the sky had a very turquoise appearance and as I mentioned above I wanted a blue summer storm, so shifting the hue a little made the sky bluer.
For the blues on the other hand, I reduced both luminance and saturation to make them more foreboding and darker. The decrease in saturation also, gave the clouds a greyer tint towards the mountains, as if you can see the rain about to fall.
More or less finished now, just the check at 100%. The chromatic aberration was quite extensive and needed some manual adjustments to remove. That was more than likely due to my adjustments in the high contrast area of the bright sky and mountains. There were no dust spots, but this was when I noticed the car and the sea while patrolling the edge for any intrusions, and thus adjusted my crop to what you see above.
Conclusion
This was a fascinating experiment by Nigel and I really enjoyed the more detached exercise. Because the images were not my own, I wasn’t there when I took the image, and that sort of, gave me a freedom with the editing process. Normally, when I edit images I’m trying to bring out the parts of the landscape that I found interesting in the moment. But because I wasn’t in the moment, I had to imagine what the landscape looked like.
The results of others was fascinating as well, the multitude of edits, and the clear evidence of different styles was amazing. It really shows off the artistic side to photo editing.
If you would like to have a go, Nigel still has the files available with the blog post about the results. Have a look through the blog post either way and you can compare my edits to some of the others. Either that or watch the video below…
Related Articles


Written by Daniel Long
Daniel Long created DRL Photography as a place to showcase his work as a photographer. Daniel has learnt a lot about photography and wishes to impart this knowledge with you, although the world is an ever changing place and he always says “you can never learn everything.” So as he makes his way, he continues to learn knew techniques, skills and information about photography. He focuses on Landscape and Wildlife photography and Daniel has a special focus on Scotland, his home away from home. As well as writing about photography and taking pictures out in the field, Daniel offers guided photography days so he can share his knowledge and locations in an effort to give his clients the best opportunities possible. Have a browse around this website to see his images, guided experiences and articles about photography. If you have any questions don’t hesitate to get in contact.


