
What is Chromatic Aberration?
Due to the current pandemic and self isolation regulations, I am unable to go out and get some new images.
Most of the images I want to be working towards are far enough away from myself that it falls into the non-essential travel, and because we are limited to one daily walk for exercise, I have a lot of time to work on the computer. This isn’t a bad thing as my to do list for the computer constantly grows, so it’s good to cross a couple of things off of the list.
So, I’ve been working through some of my older images because I didn’t like the way I had edited some of them. And the more I looked at, the more noticeable Chromatic Aberration was in the images.
That got me thinking, what exactly is Chromatic Aberration and why does it occur? So this article is an examination of this phenomenon with some tips for you to limit it in the field and what we can do in post-processing to remove chromatic aberration.

What Exactly is Chromatic Aberration?
The Apple dictionary on my laptop states that: “Chromatic aberration is the effect produced by the refraction of different wavelengths of light through slightly different angles, resulting in a failure to focus.”
That’s quite a technical definition, but it shows us that it is primarily to do with light entering the lens and refracted by the lens elements.
This means that the edges of objects can appear blurry despite the focus point.
Moreover, chromatic aberration also relates to the speed of the different wavebands of light, which means that a colour will appear around the edges of objects. This colour could be red, green, purple, magenta, blue, or even yellow.
What we want our lenses to do, is to focus all of these wavebands into a single focal point, bringing all of the colours in the spectrum together and preventing that colour fringing. That’s what we want, but that’s not what we get unfortunately.
In reality there are 2 types of chromatic aberration: longitudinal and lateral.
Longitudinal Chromatic Aberration
Longitudinal Chromatic Aberration is when the different wavebands of colour do not converge on the same point.
So the example above, entitled No Chromatic Aberration shows the different colour waves of light coming together at the optimum focus point.
Whereas the example below, shows longitudinal chromatic aberration, where the different waves of light are separate going through the focus point.
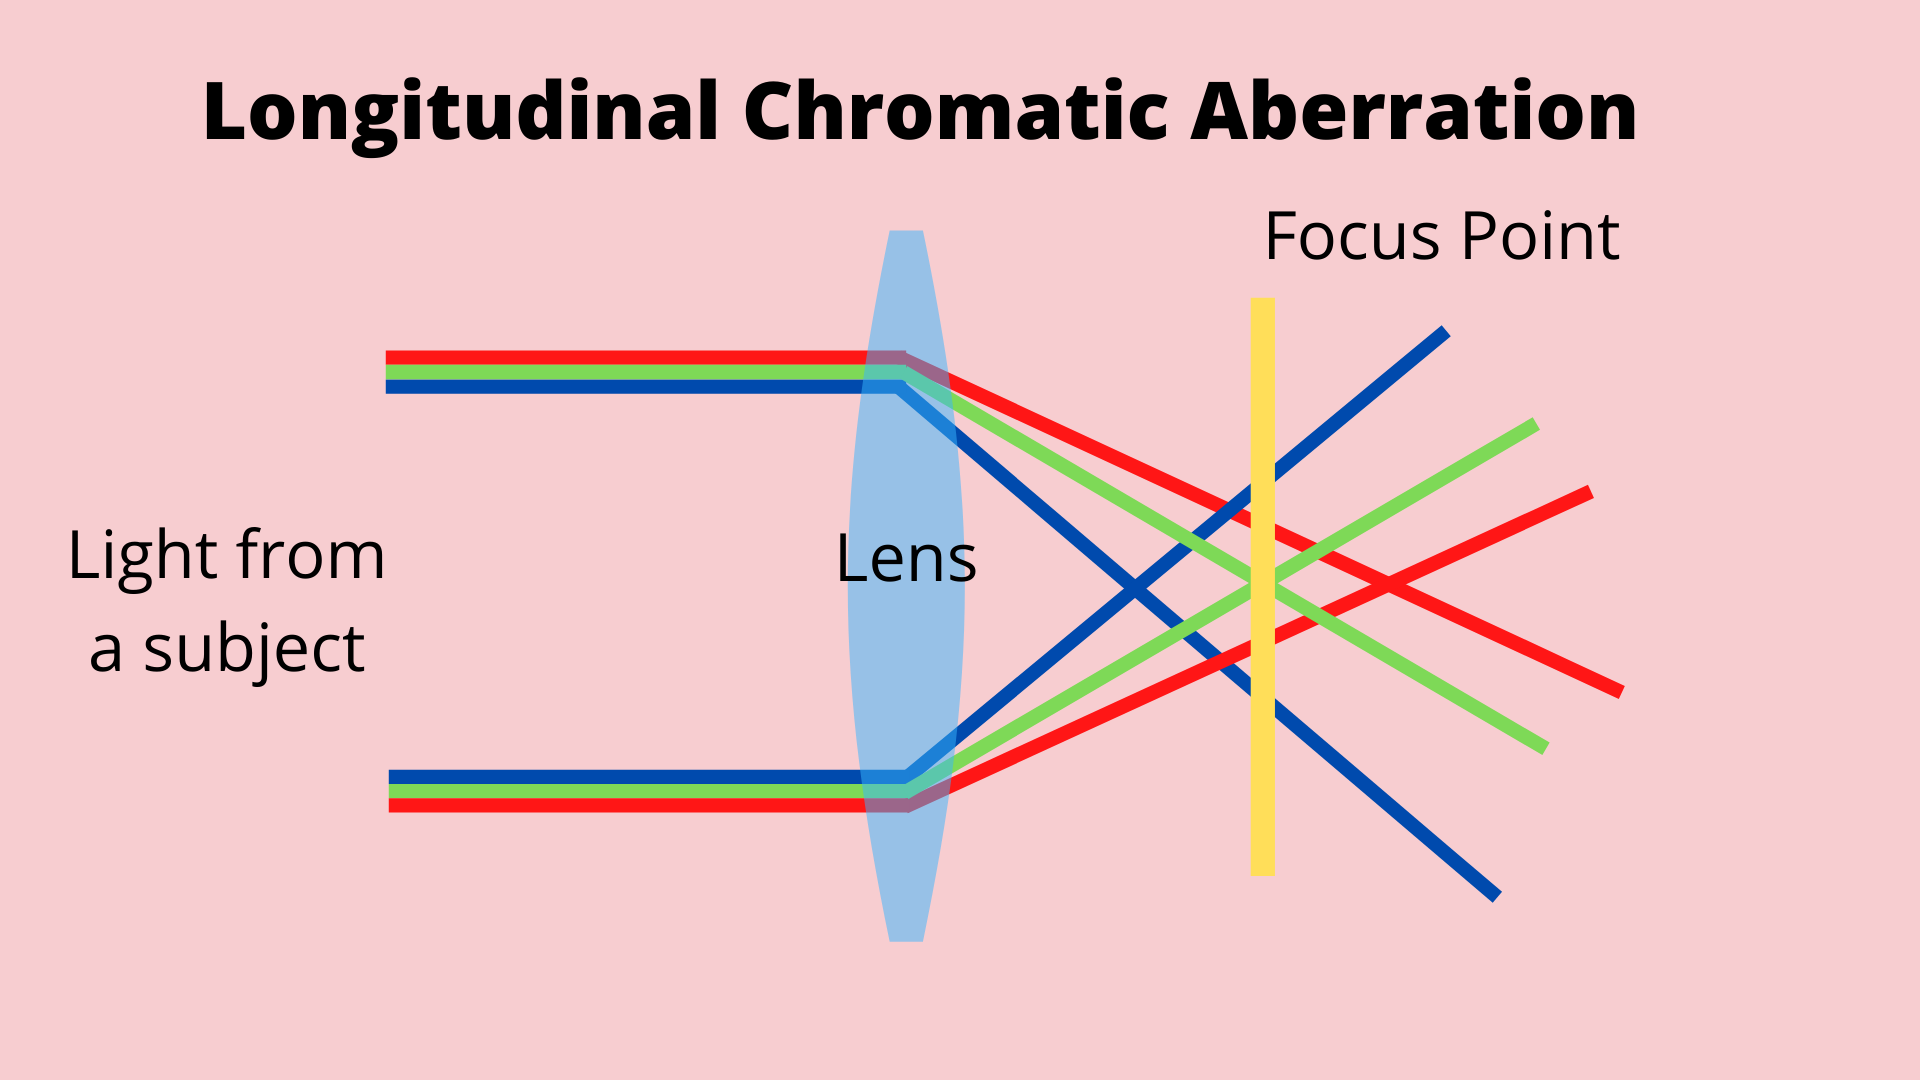
The wavebands of light in the colour spectrum are travelling at different speeds and after hitting the lens they are being refracted, or separated, so that when the light reaches the camera sensor, it’s detecting and recording all of these different wavebands.
This leads to colours fringing, which if I were to describe it, it looks like a halo of colour around the edges of the subject in the image. This can be green, purple, red, blue, or a combination of different colours.
This type of aberration can appear throughout the image, including the centre of the image.
And very wide apertures, for example f/1.2, are particularly prone to this type of chromatic aberration.
Below, I’ll explain how to control it behind the camera, and to correct it in Lightroom…
Lateral Chromatic Aberration
Lateral chromatic aberration can also be called transversal chromatic aberration, and it occurs when different colour wavebands travel through the lens at an angle and then each colour meets with itself at the focal plane on the other side, but they do not converge all together to form white light.
That’s quite a mouthful and I hope the diagram below shows what I’m trying to describe.

With this type of chromatic aberration, blue and purple fringing around the edges of subjects is most common.
Unlike longitudinal, lateral chromatic aberration will not be found in the centre of an image and really only occurs towards the edges. In particular it is found in wide-angle, fish-eye and cheap lenses.
It’s often the case, that if you have lateral chromatic aberration, then you are likely to have longitudinal as well.
So, What can we do?
So, if chromatic aberration is a common occurrence, what can we do to reduce its affect?
Well, many modern lens makers are trying their hardest to reduce chromatic aberration by using special designs and lens coatings and all sorts to limit the possibility of chromatic aberration happening with their very expensive lenses.
As well as that, most modern DSLRs have in-built chromatic aberration control and removal, which works as the camera records the image. But even with the best technology it might still occur.
The best defence against chromatic aberration is to close the aperture down a couple of stops, in other words if you were shooting at f/1.2 and there was horrible colour fringing, then try shooting at f/4 or lower and see if that looks better.
To be honest, this will only help with longitudinal chromatic aberration and if you have lateral, then changing the aperture won’t decrease its effect.
So, if my aperture won’t stop chromatic aberration what else can I do. Well, luckily this has been a problem for photographers for a long time and the wizards at Adobe include a tool in Lightroom, which analyses the image for chromatic aberration and completely removes it!
It works most of the time, on a couple of my images this past week I also had to adjust the manual settings, in particular when it was purple fringing.

So, when examining your images at 100% or 1:1 look around the edges for colour fringing.
Then all you have to do is click Remove Chromatic Aberration and 90% of the time that’s enough to remove that horrible colour edging.
If it doesn’t work, click to manual and while examining the image at 1:1 adjust the sliders until the colour you can see is removed.
The sliders are pretty self explanatory, as you pick based on the colour of the fringing.

Conclusion
Thanks to the wonders of technology, chromatic aberration is becoming less of an issue, but it is still something that modern cameras and lenses cannot completely remove.
Changing the aperture might remove some of the longitudinal chromatic aberration but unfortunately it won’t touch the lateral.
Lightroom has one of the easiest controls to remove any remaining chromatic aberration with a simple click of a button.
Related Articles


Written by Daniel Long
Daniel Long created DRL Photography as a place to showcase his work as a photographer. Daniel has learnt a lot about photography and wishes to impart this knowledge with you, although the world is an ever changing place and he always says “you can never learn everything.” So as he makes his way, he continues to learn knew techniques, skills and information about photography. He focuses on Landscape and Wildlife photography and Daniel has a special focus on Scotland, his home away from home. As well as writing about photography and taking pictures out in the field, Daniel offers guided photography days so he can share his knowledge and locations in an effort to give his clients the best opportunities possible. Have a browse around this website to see his images, guided experiences and articles about photography. If you have any questions don’t hesitate to get in contact.